Blog Layout

Pizza Party…. On a budget!


Pizza Party... On a Budget!

Planning your child's birthday party shouldn't be stressful; it should be fun! It is a party after all... But let’s be real for a moment - As a busy mum of 2 myself I fully relate to the fact that party planning can in fact be very stressful! 


To help us keep to a low budget and stay organised with make ahead party food prep, our to do lists and generally keep on top of our party prep I used my ‘Kids Party Food… Made Easy’ book! If you haven’t seen it, it’s linked here – definitely worth checking out if you’re in the thick of planning a kids party any time soon! 


Anyway, we recently hosted a party at home for my daughter’s 7th Birthday – family only but that still meant we were hosting 10 adults and 6 children. As we’d decided we wanted to take her out to Legoland on the day of her actual birthday, her party was really just a little add-on; which meant we needed to keep it to a budget. 


Trying to feed 16 on a tight budget though can be tough, until I realised the perfect solution that will keep both the kids and adults happy…..
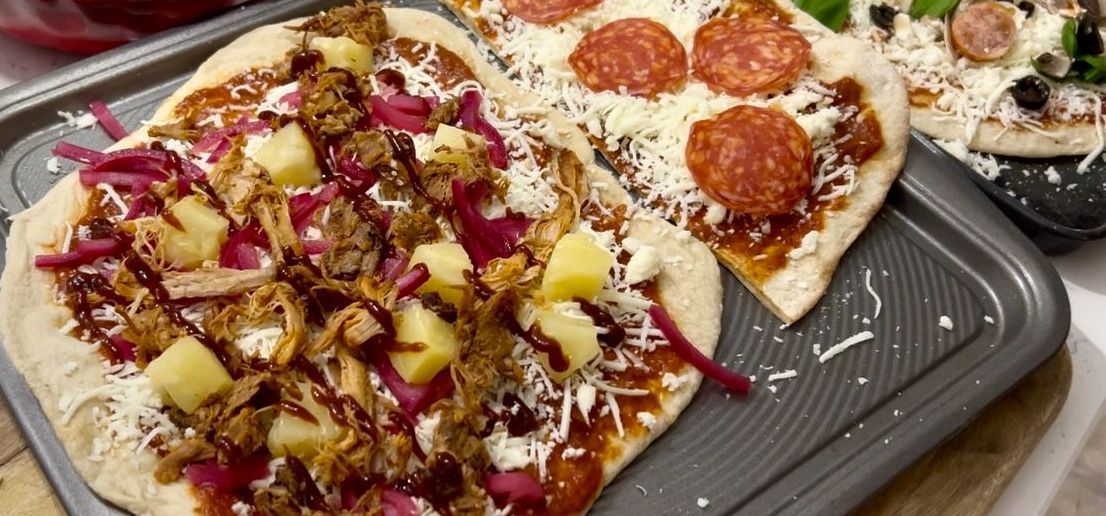
 A PIZZA PARTY!


Personally, I’m not a huge fan of the cheap supermarket pizzas you can get, but also couldn’t justify the cost of going for more expensive options when you’re in the region of needing around 12 pizzas... which also meant takeaway was totally out of our price range too. So instead, I decided to make the pizza dough instead and was absolutely BLOWN AWAY with the cost saving; so much so I ended up triple checking my calculations myself!


By making the dough ourselves, we made enough dough for 12 pizzas for a TOTAL cost of £2.52… making each pizza base just 21p! Seriously, 21p!


Now of course, making it yourself does mean you need to add a little extra prep time leading up to the party and on the day, but I was happy to spend a little more time based on how much we were saving doing it ourselves. And the good news is, the dough is freezable so you can make it a couple of weeks in advance; which is exactly what we did.


Of course, once I realised how much we were saving on the pizza bases, next minute I was also making the pizza sauce too – making a huge quantity for less than half the amount it would have cost to go for a tinned option!


I’ll pop the recipes below and some instructions, but if you want to see the full extent of our party prep; check out the video here


Freezable Pizza Dough


Ingredients


1 x 7g Sachet Yeast

320ml Water (luke warm if proving at room temp, cold if proving overnight in the fridge)

1tbsp Granulated sugar

2 tbsp olive oil

1tsp salt

500g Strong white flour (or ideally 00 grade pizza flour)


Method


1.    In a bowl, activate the yeast by mixing the yeast, water and sugar. Cover and set aside for 5 minutes.

2.    Add the rest of the ingredients; oil, salt & flour and mix until a dough is formed. If you have a stand mixer, use the kneading attachment to knead the dough for 5-10 minutes, until the dough is elastic and you can successfully do the ‘windowpane test’* (see notes). Alternatively, lightly flour a surface and knead the dough by hand. If the dough looks a little dry, add another splash of water whilst kneading.

3.    Once the dough is ready, lightly grease a bowl with a spray or brush of oil and pop the dough inside. Cover with clingfilm and allow the dough to prove at room temperature for 60-90 minutes. If you are making this dough 24 hours in advance and don’t want to freeze it, prove the dough in the fridge instead.

4.    Once the dough has risen, remove from the bowl, knock out some of the air and split into 4. Either use or freeze at this point! To freeze, just place each ball into a labelled  freezer bag and remove as much air from the bag as possible to avoid freezer burn.


  • Can you freeze the dough?

    Yes! We froze this dough in individual balls after it had been allowed to prove for 60-90 minutes and had good results. We did test part-baking the bases for around 5 minutes before freezing; which worked and is an option if you wanted to - but it would have taken a lot of room up in the freezer compared to freezing the dough as balls.

  • How do you defrost the dough?

    Remove the dough the night before and let it defrost in the fridge. An hour before you want to start rolling out your dough, remove it from the fridge and allow it to come to room temperature.

  • How far in advance can you make this dough?

    I’d personally recommend making this a couple of weeks in advance and freezing the dough so it’s a little easier in the days leading up to the party. Alternatively, you can make it 24 hours in advance but put the dough in the fridge straight away before proving (not at room temperature).

  • Do you need to part-bake the bases?

    You can simply roll out the dough and top with sauce & toppings before cooking. However, we had best results (especially as we were making a few pizzas at once!) when we rolled out the dough and part baked each base for around 4 minutes. These were then able to be stacked & wrapped until later on in the day. 

  • What’s the ‘Windowpane test?’

    When you think you’re done kneading, there is a simple test you can do to double check; otherwise known as the windowpane test and basically means that you should be able to stretch your dough to very very thin before it breaks.  Just pull off a piece of dough, flatten it and then start to stretch it. If you can keep stretching until you can see through, the dough is elastic; which means it’s ready.

Pizza Sauce Recipe


Ingredients


1 tbsp olive oil

1 onion, diced

2 garlic cloves

2 x 400g chopped tomatoes

3tbsp tomato puree

1 tbsp dried oregano

1 tbsp dried basil

1 tbsp light brown sugar

Fresh basil, chopped

Salt & pepper, to taste


Method


1.    Heat the oil in a large pan and fry the onions on a medium heat until softened. Add the garlic and fry for another minute.

2.    Add the remaining ingredients to the pan, except the fresh basil. Bring to the boil and then reduce the heat to a simmer. Allow the sauce to simmer, uncovered, for 25- 30 minutes.

3.    Add the fresh basil to the sauce and season. Blitz using a hand blender or processor.

4.    Cool down the sauce within 90 minutes and either store in the fridge for 2-3 days or freeze.


  • Can this sauce be frozen?

    Yes! Simply make it up, allow it to cool down (I show how I cooled it down within 15 minutes here) and then freeze in portions; ideally using a silicone food cube tray. If you don’t have a silicone food cube tray, you could portion in freezer bags and lay them flat in your freezer so they don’t take up much space!

  • Do you need to defrost?

    Yes. Defrost as much sauce as you need overnight in the fridge the night before. Give it a quick stir and use from cold straight on top of your pizza bases! 

  • Did making it yourself save money?

    Yes! I doubled up the recipe below which gave me 1600g sauce and cost me £4 to make. When we buy a tin of pizza sauce, it usually costs us £2.25 for 400g – so the same amount would have cost us £9 to buy! For me, the cost saving was worth a little more effort prepping the food in advance. 

Check out more blogs here

by PH935075 28 March 2025
Breakfast Muffins
by PH935075 28 March 2025
Baked Pancake Sheet
by PH935075 28 March 2025
Super Easy Granola!
by PH935075 28 March 2025
Crispy Sesame Sweet Chilli Chicken
by Jenna Brown 13 February 2025
Freezable Fluffy Pancakes!
by Jenna Brown 11 January 2023
Whether you breastfeed, formula feed, exclusively pump or combination feed, chances are you have questioned yourself over sterilising; what needs to be sterilised , how often and until when?! When our babies are little, it’s our natural instinct to want to do everything we can to protect them! So… here’s a run down of what you NEED TO KNOW when it comes to protecting them from germs and bacteria when it comes to their own feeding equipment! BUT… Before we get into the detail of the ‘what, how and when’s’ of sterilising, I’ll start by answering the simple question of Why do we need to Sterilise?! The most important factor to point out here is that babies under 1 don’t have the same immune systems as us adults, or even older children. Sterilising will help kill any bacteria present in your baby’s feeding equipment, ultimately helping to protect your baby from infections that may cause your baby to suffer symptoms of sickness and diarrhoea. But don’t be daunted by the need to sterilise equipment! It really is straightforward once you get the hang of it and hopefully this blog will help you to answer some of your questions covering EVERYTHING you need to know about sterilising… What needs to be sterilised? Regardless of whether you are breast feeding or formula feeding, there is typically always something that needs sterilising! If you’re formula feeding…… Before every feed, you will need to make sure that all parts of your baby’s bottle have been sterilised; including the bottle, teat, lid and any internal parts of the bottle such as anti-colic venting tubes. If you’re breast feeding…… If expressing breast milk, the NHS advise that you should store expressed breast milk in sterilised containers or in special breast milk storage bags (which are pre-sterilised and ready to use straight away). When it comes to sterilising breast pump equipment, this isn’t an area where there is a lot of research so often advice regarding sterilising breast pumps can differ between professionals. In the UK, the NHS recommends that all equipment which comes into contact with your baby’s milk (including equipment used to collect, store or feed expressed breast milk) is sterile. However, the Association of Breastfeeding Mothers, along with the Academy of Breastfeeding Medicine, advise that after sterilising before first use, subsequently washing breast pump parts with hot soapy water is sufficient for healthy babies . Ultimately, how often you choose to sterilise your breast pump equipment will be your own personal decision taking into account the health of your baby, what you feel comfortable with and are able to realistically sustain on a daily basis. It’s important to remember though that sterilising will always help to add an extra layer of protection for your baby; which may be particularly important if your baby is less than 3 months old, was born prematurely or has a weakened immune system. If you haven’t used your pumping equipment in a while though, it’s always best to sterilise before using. Anything else you need to sterilise? As well as baby’s feeding equipment (such as bottles), it is also a good idea to sterilise other items which regularly go into baby’s mouth like dummies for the first six months of baby’s life - especially as these items seem to always end up on the floor! Is it Necessary to Sterilise Weaning Equipment? Once you’ve finally mastered sterilising baby bottles, it is then time for weaning! Along with a whole raft of questions you may have about weaning, in those early days you might wonder…. “ Do I need to sterilise weaning equipment?!” Rest assured… if you’re weaning around the recommended age of 6 months, then there is no need to sterilise the equipment you use for food such as bowls, spoons or cups and washing in hot soapy water or using a dishwasher will be sufficient for these weaning essentials. However, if you decide to wean before 6 months, it is recommended by the NHS that you do sterilise baby’s feeding equipment until they reach 6 months. Don’t forget though that it is always important to follow good food hygiene practices at any age! Check out some of my other blogs about preparing first foods as well as tips on storing, defrosting and reheating your baby’s food here.
by Jenna Brown 22 April 2021
There’s no doubt that there are so many exciting things to think about when you begin the weaning journey with your little one like choosing a high chair, shopping for snazzy bibs, debating which cup and cutlery is best and deciding what amazing tastes to expose your baby to first... but it’s important not to forget that amongst all of this, any food you serve needs to be safe! Babies and young children don’t have the same immune system as us adults (or even older children) so we need to make sure we’re extra careful with their little tummies! It is estimated that there are 2.4million cases of food borne illness in the UK every year but it’s not just restaurants that can give you food poisoning – You can also make yourself (or your family) ill whilst cooking at home too. The good news is that there are so many things you can do whilst preparing food to prevent this…. Keep it Clean When preparing food for your little one, keeping clean is so important! In reality, this doesn’t mean having a ‘spotless’ kitchen but instead, a clean environment where you prepare food, with clean hands using clean equipment! Here’s some top tips to help you organise your kitchen to help you safely prepare meals for your baby and the rest of the family…. Wash your hands – Always wash your hands thoroughly before preparing any food, and after handling raw meat Clean work surfaces - Disinfect food preparation surfaces using a clean dishcloth before starting any food preparation. If you can, use a paper towel squirted with anti-bacterial spray to clean surfaces after preparing raw meat and poultry as this will help make sure that you don’t pick up food poisoning germs and spread them around the kitchen! Clean utensils – Make sure equipment is clean before you start using it and if you can, opt for colour coded equipment to reduce the risk of cross contamination between raw and ready to eat foods. Never prepare ready to eat food such as salad on a board that was previously used to prepare raw meat. Wash fruit and Veg – They might be low risk foods, but bacteria can also be found on fruit and veggies too so don’t forget to wash these thoroughly under cold running water before serving to baby. If you’re using frozen veggies in baby’s food, make sure that these are cooked before serving to your baby according to the back of pack information. Don’t be tempted to wash raw chicken! Washing your chicken will not ‘wash off’ the bacteria (only cooking will make it safe to eat!). If you wash chicken, you are instead more likely to cause food poisoning by inadvertently spreading more bacteria around the kitchen. Cooking Cooking veggies by steaming/ boiling or roasting is pretty straightforward, but those first tastes don’t last for long and you’ll soon be branching out to more exciting foods for your baby to try, many of which may include meat or fish. Regardless of how you serve meat to your little one, it’s important to make sure that it is thoroughly cooked. Remember - Just because it’s cooked on the outside, doesn’t mean it is cooked on the inside! Here’s how you can check that meat is safe to eat… Use a food probe – Checking the temperature of the thickest part of meat is the most accurate way (and the way I would recommend) to check food is cooked, whilst also making sure it is not overcooked! If using a probe, make sure the probe is clean and the meat has a core temperature of 75C for at least 30 seconds. Cut into the thickest part of the meat to make sure there is no pink meat visible The meat must be steaming hot throughout Meat juices run clear
by Jenna Brown 21 April 2021
One of the things I ALWAYS get asked is whether it is safe to reheat rice! If you’re anything like me, I can never seem to gauge just how much rice to actually cook so I always seem to have left-overs. But, what’s all the fuss about with leftover rice? It’s important to know that if cooked rice is not handled correctly, it can make you (or your little one) violently ill. Rice contains bacteria called Bacillus cereus. Bacillus cereus is a spore forming bacteria; meaning that it forms protective layers (spores) which survive the heat of cooking. If cooked rice is left at room temperature for too long, then the bacteria can multiply and produce toxins; which can cause food poisoning. It’s important to point out here that once these toxins are present, they will NOT be killed by further reheating; regardless of reheating until piping hot! So, how can you handle leftover rice safely? How quickly you cool rice after cooking is critical in ensuring that your leftover rice will be safe to use. You should always make sure your rice is always cooled down as quickly as possible, but always within an hour and a half! This doesn’t mean just putting cooked rice straight in the fridge though…….. Simply putting hot rice in the fridge may not be enough to help cool it down quickly, especially as this will also raise the temperature of the fridge itself. Instead, I’d recommend stirring rice regularly and helping to speed up the cooling process either by: Running it under cold water (this works great if you’ve not added anything to the rice!) Dividing it into smaller portions Stirring regularly Using a homemade ‘ice bath’ – Like this….
by Jenna Brown 19 April 2021
The prevalence of allergies across Europe has sharply increased over the past 20 years and in the UK, it is estimated that over 2 million people are living with a diagnosed food allergy, excluding those with food intolerances. Whether you have personal experience of living with a food allergy, have dealt with it when weaning or have simply heard some of the tragic stories of others, there’s no doubt that allergies is something we have all become more aware of over the past few years! Dealing with food allergies can be a daunting and overwhelming experience so if you or your little one is diagnosed with an allergy, you may feel anxious. Hopefully this blog will help to give you confidence in understanding food labels by identifying exactly what is required by law, what a food label should look like, may contains as well as busting some common food allergy myths! 🥜 Allergen Labelling What’s required by law? Since 2014, it has been a legal requirement for all food businesses in the UK to declare if any food they provide contains any of the 14 major allergens as an ingredient. Whilst you may have an allergy outside of the 14, these allergens are the only ones that are required to be declared by law: Celery – (May also be listed as celeriac) Cereals containing Gluten (such as barley, wheat, oats, rye, spelt) Crustaceans (such as prawns, crabs and lobsters) Eggs Fish Lupin Milk Molluscs (such as mussels and oysters) Mustard Nuts (tree nuts such as almonds, hazelnuts, walnuts, brazil nuts, cashews, pecans, pistachios and macadamia nuts) Peanuts Sesame Soybeans (soya) Sulphites If you or your child is allergic to an allergen outside of the major 14, then you should still be able to identify whether it is present (or not) in pre-packed food by checking the full ingredient list…. It might just take a little longer to spot! How to identify food allergens on packaging? For any pre-packed food, you will always be able to find the allergens within a product by checking the ingredients list on the back of pack. In compliance with European legislation, allergens must be emphasised on the label of prepacked food; which could either be bolded, highlighted or underlined. Just remember to check the food label every time, even if you’ve purchased a food before as ingredients and recipes can change! Here’s an example of how easy it should be to spot any of the 14 major allergens when reading a food label...
by Jenna Brown 19 April 2021
It is really important to embed a good hand washing routine as early on in life as possible. As your baby progresses into a toddler, it’s important to change your hand washing technique as they grow, keeping it fun whilst giving them lots of praise and encouragement! Here’s some ideas how you can start getting your toddler involved in washing their hands and help them to understand that it’s an important part of their daily routine… Get a step stool so they can reach the sink themselves Give them independence – Toddlers LOVE the feeling of being able to do something for themselves, so supervise to make sure they wash their hands properly but let them do the main work themselves. Always communicate with them to tell them it’s time to wash their hands and why (it’s dinner time for example!) Sing a song with them whilst they wash their hands. Hands should be washed for 20 seconds which is enough time to sing ‘Happy Birthday’ twice, but you could always sing along to a nursery rhyme or any other song your child loves to make sure they stay at the sink long enough! Teach them the importance of washing their hands using body paint or glitter every so often so that they have a visual aid of how they need to wash their hands for them to be clean .. And don’t forget to also wash your hands at the same time! Not only will this help keep everyone safe, but seeing you lead by example will be a great learning tool for your little one from any age.
Show More
Share by: